Continuous Delivery for Static Sites
November 6, 2017
In this article I’ll show that the typical approach for deploying sophisticated static sites is not sufficient, and explain how we can apply the principles of Continuous Delivery to improve the situation. We’ll then walk through a worked example, building a fully functional continuous delivery pipeline for a single page React application.
The rise of the static site
The client-side capabilities of modern browsers have made great strides in recent years. We’ve also seen an explosion in PaaS products aimed at replacing functionality which would previously have been delivered via custom backends. It’s become more and more feasible to deliver an app as a static site, where all functionality is implemented via HTML, CSS, client-side javascript and 3rd party APIs, with no custom backend code at all.
This provides a very attractive option for building out an application without the operational complexity of deploying and managing server-side infrastructure. There are less moving parts, and operational worries become Someone Else’s Problem when you’re delivering your static site using something like Amazon S3.
Change management for static sites
With these modern capabilities, client-side apps have evolved from a set of simple static HTML pages into sophisticated single page web apps. However, change management for these static sites has not evolved at the same pace. Deploying a production change is often still done in a very unstructured way. Perhaps with a developer running through a set of manual build steps and then pushing some artifacts directly to a production S3 bucket. These type of ad-hoc processes might make sense for deploying a simple change to some static content, but for a full-fledged app they are problematic. Any production change involves manual work from one of a small set of “experts” who are able to perform the correct incantation of processes. Code changes are not always robustly tested and not always consistently applied. There’s usually no way of knowing what’s been deployed into a given environment, or when it was done so.
The case for Continuous Delivery
A decade or so ago this situation was the norm for software deployment generally. What changed in the deployment of backend systems was a move towards Continuous Delivery practices. A strong focus on automation along with the formalization of a delivery pipeline helped to solve a lot of these issues for backend code. The same ideas can be easily applied to static sites.
We can replace manual processes with automated ones, and replace poorly documented deployment steps with a declarative software delivery pipeline. In doing so we achieve a predictable, consistent deployment process which performs the exact same sequence of steps every time. We are able to test a code change in a pre-production environment with confidence that it will behave the same in our production environment. By including automated testing as part of our delivery pipeline we ensure that our changes are always tested before being deployed. By having machines perform deployment steps rather than humans we reduce the time taken to deploy and can increase the rate at which we deliver changes to our users.
Applying CD
In this post I’ll present an example of how we can do all of the above for a simple static site. We’ll build a simple but functional continuous delivery pipeline for a small single-page app hosted out of Amazon S3. We’ll end up with a fully automated deployment process which is:
- FAST: changes show up in a live environment within seconds of being pushed to master
- ROBUST: no code change can get into production without first proving its worth by passing our automated tests
- REPEATABLE: every deployment is carried out in the same way, with no room for human error
- CONSISTENT: the code we test in staging is always the exact same code that gets deployed into production
- AUDITABLE: we have a record of every deployment, courtesy of our CD tooling. We know where every change came from, courtesy of version control. There’s no way for someone to make a sneaky manual change in order to “fix” something in production.
A deployment pipeline for nxtbrt.com
We’ll be working on the deployment infrastructure for a real site. We’ll be deploying nxtbrt.com, a side-project of mine. It’s a simple transit schedule app for the San Francisco Bay Area’s BART system, implemented as a single-page React application. This app runs entirely client-side, pulling live schedule information directly from BART’s real-time API. There’s no need for a backend service, which allows our app to be deployed as a static website hosted out of an S3 bucket.
You can browse the source code for nxtbrt.com - as well as its CD configuration - on github.
The pipeline
Any code change for this app goes through a fairly typical sequence of steps, which eventually lead to a new deployment of nxtbrt.com in production. First we run automated tests against the code. We then build a deployable version of the app, and then deploy it to a staging environment. After some light manual acceptance testing we then deploy the same build to our production environment. We’ll be creating a Continuous Delivery pipeline which models this delivery process as the following sequence of pipeline steps:
- Test
- Build
- Deploy to staging
- Deploy to production
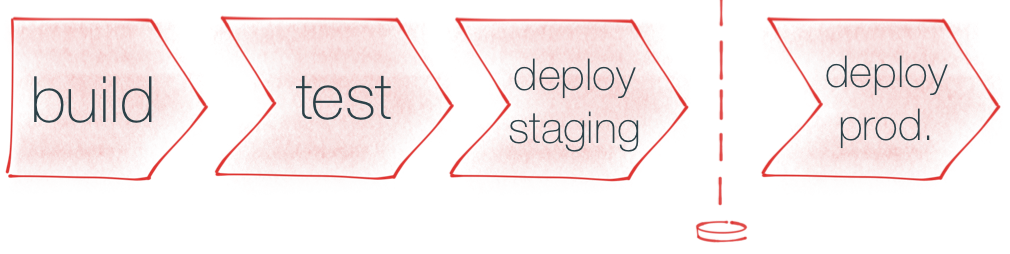
Any code change that lands on our master branch will be moved automatically through each step in this pipeline, although we’ll introduce a manual gate before the production deployment. This will allow us to perform manual testing of the code change in staging before it’s signed off and deployed to prod.
Codeship
We’ll be implementing this CD pipeline using Codeship, a hosted Continous Delivery platform.
Specifically, we’ll be using CodeShip Pro, which uses Docker containers to isolate each step of the build pipeline. This provides a nice repeatable build environment - our steps run in the exact same computational environment each time. It also makes it easy to run a pipeline step locally in almost the exact same environment it would run in within the CD platform.
CodeShip Pro follows the pattern of representing the entire pipeline configuration via configuration files that live in the same repo as the app itself. This gives us version control of our build pipeline and allows us to change both the app and the way it’s built within a single, atomic code commit.
Defining our CD pipeline
Step 1: Test
To get started we’ll set up a really basic single-step pipeline which runs our app’s automated tests whenever we check in code. We start by adding a simple test.sh script to our codebase:
#!/bin/sh
set -e -u

yarn install
yarn test -- --coverage
Our script starts with a shebang which indicates that this script should be run using the sh interpreter. We use set -e to ensure that any individual failure within the script will cause the entire script to fail. We use set -u to ensure that we fail fast if our script contains references to undeclared variables. See this awesome blog post for more details on these flags, along with additional tricks for creating safer shell scripts.
With our scripting administrivia out of the way, the next line in our script runs yarn install to install our application’s dependencies. Then we run yarn test to actually execute our automated tests, using a --coverage flag to also capture code coverage information.
This script encapsulates all that’s necessary to run our automated tests. Next we need to configure CodeShip to run it as a build step. We configure CodeShip’s build steps by placing a codeship-steps.yml file in the root of our code repo:
- name: test
  service: workshop
  command: sh ./codeship/steps/test.sh
This file defines a build step called test which CodeShip will automatically run whenever it sees a new code commit land. That build step is configured to execute the test.sh script we just created.
CodeShip runs every build step within a Docker container, which it refers to as a service. We’ve specified that our test build step should run within the workshop service, but haven’t yet told CodeShip what that service looks like. We do that via a separate codeship-services.yml configuration file, also placed in the root of our code repo:
workshop:
  image: node:alpine
  volumes:
    - ./:/usr/src/app
    - ./tmp/artifacts:/artifacts
  working_dir: /usr/src/app
This tells CodeShip that our workshop service uses the node:alpine docker image, and configures some mapping from locations in our code repo to locations within the running container.
With these three files (test.sh, codeship-steps.yml and codeship-services.yml) added to our code repo we have successfully set up a simple CI pipeline for our app! Every time we push changes to our code repository those changes will automatically be validated against our test suite.
Next we will set up a full deployment pipeline, where any change which lands on our master branch will automatically be deployed to a staging environment (assuming it passes our test suite of course).
Step 2: Build
The first thing we’ll do to automate our deployment is create an additional pipeline step which will package up our app into a set of static files optimized for deployment into a production setting.
Our app is a simple single-page react app, and because it was created using create-react-app we already have most of what we need to create an optimized set of static files. We just need to do some simple orchestration, via another shell script:
#!/bin/sh
set -e -u

yarn install
yarn build

rm -rf /artifacts/build
mv ./build /artifacts/build

echo "$CI_COMMIT_ID/$CI_BUILD_ID" > /artifacts/build/VERSION.txt
This script installs our app dependencies, then uses the yarn build command that create-react-app provides to place an optimized static build of our app within the ./build directory. We then move those files into /artifacts/build. /artifacts is a shared volume which we are using to expose the artifacts created in this pipeline step to subsequent steps (you can read more details on this technique here). Finally we add a VERSION.txt file to the set of build artifacts which will be deployed. This file is a handy way of easily determining the provenance of a given deployment - we can hit /VERSION.txt in a live deployment of the site to find out the exact code commit and build pipeline which produced the currently deployed app.
We want to run this script as a new pipeline step. That’s as simple as adding a new section to our codeship-steps.yml configuration file:
- name: test
  service: workshop
  command: sh ./codeship/steps/test.sh

- name: build
  service: workshop
  command: sh ./codeship/steps/build.sh
With these two changes checked in our pipeline will now not only run tests but also create a deployable production build of our application. But we’re not yet deploying those files anywhere. Let’s work on that now.
Step 3: Deploy to staging
Just like with our other pipeline steps, the first thing we’ll do is create a script:
#!/bin/sh
set -e -u

TARGET_BUCKET="staging.nxtbrt.com"

cd /artifacts/build

echo "*******************************************************"
echo "* "
echo "* deploying the following files to $TARGET_BUCKET..."
echo "* "
echo "*******************************************************"

ls -lR

aws s3 sync --acl public-read --delete . "s3://$TARGET_BUCKET/"

echo "deployment complete"
The heavy lifting in this script is done via the aws command-line tool, which we use to push the current contents of the /artifacts/build directory up into an S3 bucket called staging.nxtbrt.com which we’ve configured to host a static website.
Now let’s add that script as a pipeline step:
- name: test
  service: workshop
  command: sh ./codeship/steps/test.sh

- name: build
  service: workshop
  command: sh ./codeship/steps/build.sh

- name: deploy staging
  service: deployer
  command: sh ./codeship/steps/deploy_staging.sh
Note that we’re using a new codeship service called deployer to run this new pipeline step. Let’s take a look at how that’s configured, in codeship-services.yaml:
workshop:
  image: node:alpine
  volumes:
    - ./:/usr/src/app
    - ./tmp/artifacts:/artifacts
  working_dir: /usr/src/app

deployer:
  image: codeship/aws-deployment
  volumes:
    - ./codeship/steps:/codeship/steps
    - ./tmp/artifacts:/artifacts
  encrypted_env_file: codeship/deployer.env.encrypted
There are a few things going on with this new service. It’s configured to use a docker image called codeship/aws-deployment. As the name suggests, this is a docker image provided by the engineers at CodeShip which comes pre-installed with AWS automation tooling - such as theaws CLI tool which our script requires. If we’d have used the workshop service we wouldn’t have that command available for use by our deploy script. The deployer service is also configured to mount the same artifacts directory that the workshop service uses. This allows the deployable artifacts created during the previous build step in the pipeline to be available during the subsequent deploy step. Lastly, we’re using encrypted environment variables to pass AWS credentials to the aws tool. As an aside, for the sake of security I strongly suggest using credentials for a specifically-created IAM user which only has permissions for the S3 bucket upload needed for this deployment task.
Only deploying master
With these new configuration changes our CD pipeline is now set up to automatically test our code and then deploy it to our staging environment. There’s one little problem though. By default CodeShip will run the pipeline against any commit which is pushed up to our code repository. But we don’t want any old branch that has a change pushed to be deployed to staging - we only want contain the latest from our master branch - no other branches. This is easy to fix. CodeShip allows us to limit a step to only run for commits on a specific branch, like so:
- name: test
  service: workshop
  command: sh ./codeship/steps/test.sh

- name: build
  service: workshop
  command: sh ./codeship/steps/build.sh

- name: deploy staging
  tag: master
  service: deployer
  command: sh ./codeship/steps/deploy_staging.sh
Note the new tag parameter in the deploy staging step. Now our test and build steps will run for commits pushed on any branch, but we will only deploy to staging if a commit is on our master branch.
Step 4. Deploy to production
Let’s get our code deployed into production. We’ve already configured a separate S3 bucket as the static host for our production site. We could just copy-paste our deploy_staging.sh script to a new deploy_prod.sh script and modify the bucket name, but it’s cleaner to instead move to a general purpose deploy.sh script, making the bucket name configurable:
#!/bin/sh
set -e -u

if [ -z ${1+x} ]; then
  echo "a target bucket must be specified (e.g. \`deploy.sh staging.foo.com\`)"
  exit 1
fi

TARGET_BUCKET="$1"

cd /artifacts/build

echo "*******************************************************"
echo "* "
echo "* deploying the following files to $TARGET_BUCKET..."
echo "* "
echo "*******************************************************"

ls -lR

aws s3 sync --acl public-read --delete . "s3://$TARGET_BUCKET/"

echo "deployment complete"
We now simply need to modify our step configuration to use this new generalized script for both staging and production deployment:
- name: test
  service: workshop
  command: sh ./codeship/steps/test.sh

- name: build
  service: workshop
  command: sh ./codeship/steps/build.sh

- name: deploy staging
  tag: master
  service: deployer
  command: sh ./codeship/steps/deploy.sh staging.nxtbrt.com

- name: deploy prod
  tag: 'MARKER/prod'
  service: deployer
  command: sh ./codeship/steps/deploy.sh www.nxtbrt.com
Simple enough.
You may have noticed the strange MARKER/prod branch filter we’ve specified for the deploy prod step; I’ll discuss that next.
Continuous Deployment vs. manual acceptance testing
For this app we aren’t confident enough to implement full Continuous Deployment - where every code change which passes automated tests is automatically pushed all the way through to production. Instead we want to do some manual acceptance testing of a change (or batch of changes) in our staging environment, and then manually push them through to prod once they’ve passed muster. However we still want all of our change control to be managed via our CD pipeline - we don’t want deployments to prod to be run from some separate system.
Implementing this type of manual UAT (user acceptance testing) from within a CD pipeline is usually done via a manual gate sitting in front of our production deployment. After manual testing is done an operator would push a button in the CD system to mark the change as approved, triggering the pending production deployment step. CodeShip doesn’t have that capability, so we are using a somewhat hacky workaround in the form of a marker branch. Once a set of changes have been manually approved an operator can trigger a production deployment by simply fast-forwarding the MARKER/prod branch to point to the commit that is being approved. Our CD system will notice that the branch has moved and re-run the pipeline, including a production deploy at the end. Definitely a bit of a hack, but a functional one.
Victory!
With these final set of file changes we are done. We have created a fully functional Continuous Delivery pipeline for our little static site. Any code change that lands on our master branch is automatically tested and deployed into a staging environment within a few seconds. After someone has manually verified a change it is a one-line command to promote the exact same code into production.
Our deployment process is now:
- FAST: changes show up in staging within a few seconds of being pushed to master
- ROBUST: every change that is heading to production must first prove its worth by passing our automated tests.
- REPEATABLE: every deployment is done the same way, with no room for human error
- CONSISTENT: the code we test in staging is always the exact same code that gets deployed into production
- AUDITABLE: we have a record of every deployment, courtesy of our CD tooling. We know where every change came from, courtesy of version control. There’s no way for someone to make a sneaky manual change in order to “fix” something in production.
Pro Tips for maintainable CD infrastructure
This worked example has included some tricks and techniques which I’ve picked up while building CI/CD pipelines over the years. I’ll briefly highlight a few here.
separate build from deploy
It’s a good idea to have a distinct step in your pipeline which is solely responsible for creating a deployable artifact, along with separate steps which are responsible for taking that artifact and deploying it into a specific environment. In our simple example our build step created the artifact - in the form of an /artifacts/build directory full of production-optimized static files.
Having a distinct build step forces you to create a well-defined deployable artifact that is not specific to any one environment. With that artifact defined you can then create deployment steps which all work off of the same deployable artifact. This provides confidence that the artifact you’re deploying to production is the exact code that has been validated and tested earlier in the pipeline - one of the big wins from CD.
version-stamp your artifacts
A related tip is to always include something in every deployable artifact which lets you trace its provenance. I typically do this via a VERSION file which is baked into the deployable artifact and contains metadata such as a build number, a commit SHA, perhaps a timestamp and a repo name. This allows you to take always be able to answer the question “where exactly did the bits currently running in this environment come from?”.
prefer scripts to pipeline configuration
I always strive to keep my CD tooling configuration as minimal as possible, particularly when it comes to the actual work being done by each step in the pipeline. The ideal is what we have in this worked example - the CD configuration just contains a reference to a script, and all the real work is encapsulated behind that script.
The main motivation for this is to keep your build infrastructure testable and debuggable. I want to avoid the number of instances where the only way I can test a build change or debug a build breakage is by running something within my CD infrastructure. It’s tedious, forces a really slow feedback loop, and is prone to error. Much better to be able to run the relevant script on a local workstation (or docker container) in order to reproduce an issue or test out a local change before committing.
treat your infra code with respect
It’s tempting to succumb to the fallacy that your build pipeline isn’t “real” software, it’s “just” scripts and configuration. In fact this is code which will be maintained and extended over time, just like “regular” production software. You can apply the same principles which keep “regular” code maintainable to your infrastructure code. Strive for small, well-documented modules. Organize your scripts into directories and give them good names. Extract shared functionality into helper functions. Treat copy-pasted code as a smell.
least privilege
By their nature CD pipelines involve low-level access to production infrastructure. Along with this power comes the responsibility to minimize the potential for a badly-behaved script to do damage or expose sensitive data. We can partially mitigate this risk by applying the principle of least privilege, along with fine-grained access control. The authentication credentials provided to a deployment process should provide the minimum set of permissions necessary for that process. A deployment script which updates content in an S3 bucket shouldn’t have permission to modify network settings, read databases, or create EC2 instances. A deployment script which is updating a staging environment shouldn’t have any access to production systems.
Going Further
We’ve created a basic CD pipeline for nxtbrt.com in this post. There are plenty more details I could go into - how to configure S3 buckets correctly, how to configure CloudFront, DNS, and SSL, how to create an appropriately restrictive IAM role for your deployment scripts, etc, etc. However there are also a lot of other articles out there on the internet covering the details - my focus was on how to drive this type of deployment from a CD pipeline.
PReview environments
One more advanced technique which I’d like to cover in a future post is using your CD pipeline to dynamically spin up ad-hoc environments for use in reviewing a change before it is merged into master. Heroku provides this capability via their Review Apps feature, but it’s also quite possible to using infrastructure automation to hand-roll something similar. I call these PReview environments since they’re often used for PR review before the PR is merged.
I can help your team
I consult with engineering teams to help them build and enhance this type of Continous Delivery capability. If you’re interested in how I can help your team, please don’t hesitate to get in touch.